Working remotely, like teleworking or telecommuting, is becoming more popular nowadays. Being able to access files on another computer that is miles away from you can be a real lifesaver. So here is how to set up a Virtual Private Network (VPN) on Windows 10 or Windows 11 using LogMeIn Hamachi.

Hamachi is a hosted VPN service that allows you to access files on another computer remotely. It works well for home users or small businesses that just need to open and save data on a computer outside of their network.
And pricing for Hamachi is pretty reasonable. If you have five (5) or fewer computers than need VPN service, it's free. I have set up Hamachi several times for customers that just wanted to access files while they were on vacation.
Setting up Hamachi is pretty simple. The first thing you will need to do is create an account over at VPN.net. Once you have created an account, you will log into your account, set up your network, and deploy the Hamachi software to your computers.
Note: When you log in to VPN.net, you will be taken to the LogMeIn website. Hamachi is one of LogMeIn's products. Everything you will need for configuring and deploying Hamachi will be under the Networks menu in the left-side column. Completely ignore the rest of the sub-menus in the left-side column, as they are for other LogMeIn products.

Under the Networks tab, you will find three sub-menus: My Networks, Deployment, and Network Settings. The majority of configuration for your Hamachi VPN can be done under My Networks. Here you can Add Client or Add Network. You can add clients or networks in whatever order you want, but for this article, we are going to start with setting up a network first.
Now there are three (3) types of networks you can create in Hamachi: Mesh, Hub-and-spoke, and Gateway. For the free version (under five clients), a mesh network is recommended. Keep in mind that once you create a network, you cannot change the type of network it is. If you want to change the network type, you will need to create a new network.
And since you can have multiple types of networks, all you have to do is give them different names. And you can quickly reassign a client to a different network if you want. For this article, we will create three (3) various networks based on their type.

The following is a list of the different types of networks.
- Mesh - With this type of network, every device is directly connected to each other. This is a simple, no-frills, peer-to-peer type network and a good choice when each device needs access to all of the other devices on the network.
- Hub and spoke - This type of network is more restrictive and is more like a standard corporate network. With this type of network, you have servers (hubs) that have access to all of the devices (spokes), but the devices only have access to the resources on the servers, not each other.
- Gateway - This type of network is a standard point-to-point VPN. The gateway device controls IP addressing and allows remote devices to access the entire network. There can be only one gateway in this network, and it cannot be a workstation that is a member of a domain.
Once you have decided on the type of network you want, you need to configure some of the details of it. How you will the devices join the network, is a network password required to join, and the subscription associated with the network. Just go to My Networks in the left-hand column and left-click on the Add Network button.
Remember that you can easily change any of the settings for your network(s) from the website interface. You can add or remove devices with a click of the mouse. It comes in handy if you find a device that is having trouble connecting to a specific network.
Once you have a network setup, it's time to get deploying the Hamachi installer to the clients. Now you might have noticed that I have been referring to the Hamachi members as devices. That's because you can have computers and mobile devices connecting to your Hamachi VPN.
Computers have software that you install to connect to your network, and mobile devices do not. Mobile devices use web browsers to access resources on your network. And since there is no app to install on mobile devices, you cannot share any resources on them. For this reason, I am going to focus on setting up Windows 10 computers on the VPN. I have included links at the bottom for how to connect Android and iOS devices.
There are a couple of ways to deploy the Hamachi software to your computers. You can either directly download it from the LogMeIn website when you are logged into your account (preferred) or send an installation link via e-mail. I like to directly install it from the site, as I can check the status of the installation as soon as it is done.
When you directly download the software from the website, you do not have to option of predefining a network to attach it to. When you send a link via e-mail, you can decide what network to add it to. But changing the network that a Hamachi client is attached to is easy on the website. Like I said before, you can do all sorts of modifications to your network(s) on the site.
The Hamachi software will work on various operating systems, including Windows Vista, Windows 7, Windows 8, Windows 8.1, Windows 10 and Windows 11. It also works on Mac OS 10.6 or higher, Ubuntu 16.04 or higher and CentOS 7.2 or higher. The only drawback is that you cannot use a Mac OS computer as a gateway, but it can be a client on a gateway network.
Once you download and install the Hamachi software on your computer, you should be able to see it listed in the LogMeIn website console. It will show up under the network name you attached to or as a non-member client.

If the computer is shown as a non-member client, just click on the Edit link on the right-hand side, then click on the Networks tab and select the network(s) you want it to be a member of.

Then just click on Save.
Now click on the My Networks tab in the left-hand column, and that computer should now show up under the network(s) that you just attached it to.

It will have a status indicator (dot/circle) to the left of its name. Green means it is online; red means it is offline.
Technically, we should now have our VPN all set and ready to go. The next thing we have to do is to set up the resources we want to share. There are two (2) things we can share across a network, folders/files, and printers. Now since we are connecting to a remote network that is not close to us, you may not want to set up a remote printer.
Setting up folder sharing on a Windows computer can be a little frustrating, so here's a link to an article that shows you how to share a folder on Windows 10.
How to share a folder on a private network in Windows 10
Sharing a printer is pretty simple. On a Windows computer that has the printer attached you want to share, bring up a Run dialog box and type in control printers. Then click OK.

The Device and Printers dialog box will appear. Just right-click on the printer you want to share and left-click on Printer properties.

Left-click on the Sharing tab and left-click on the box next to Share this printer. You can keep the name that appears or change it to something that might make more sense to a remote user. Maybe add in the location of the printer (city or office name). Then left-click on the Apply button in the lower right-hand corner.
Now that you have got the resources you want to share ready to go, let's go ahead and get things set up. The first thing we need to do is bring up the LogMeIn Hamachi program. By default, it starts up when you start Windows, and the icon is located in the notification area on the Taskbar (down by the clock). Just right-click on the icon and left-click Restore. You can also double-click on the shortcut on the desktop.
Now that you have the Hamachi program on the screen, right-click on the name of the computer you want to access the folder(s) or printer(s) on.

Left-click on Browse in the context menu that appears. This will bring up the File Explorer with a list of resources that are shared on that computer.
To access a shared folder, we could just double-click on the folder name and be done with it. But we would have to open the Hamachi program every time we wanted to get to that folder. But we can just map that folder to a drive letter and access it through File Explorer.
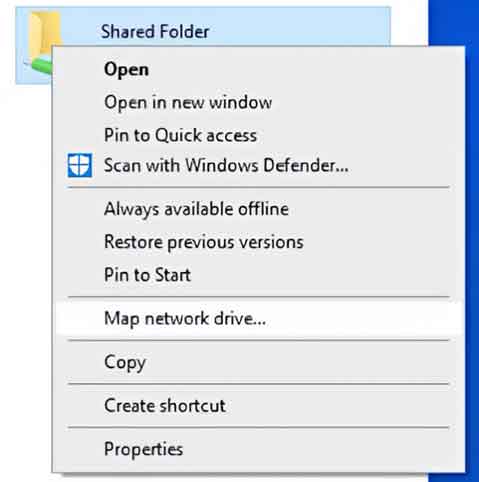
To map a shared folder, just right-click on the name of the folder and left-click on Map network drive.

The Map Network Drive form will appear. Just select the drive letter you want to use for the folder from the pull-down menu.

Make sure that Reconnect at sign-in is selected and click on Finish.
To use a remote printer, we will need to install the remote printer on your computer.

To do this, we need to right-click to the name of the printer and left-click on Connect. Windows 10 will then download the driver for the printer and install it into your computer.
At this point, you should be ready to go with your VPN. Just remember that you need to be connected via the LogMeIn Hamachi program to be able to access any shared folders or printers.